In the interest of time – that being that I don’t have much of it – I have shamelessly plucked this post from my personal blog. Because sometimes, that’s exactly How We Do It: we double up or skip something or use something twice for the sake of efficiency. Enjoy!
********************
During Ike, we started each of the kids on rice cereal, but that’s just because we had time to kill being evacuated in San Antonio and what better thing is there to do than to video your kids eating food so you can post the clips for the Internet to see?
However, we didn’t officially start the RJBs on rice cereal until October 4, around 5 ½ months. We were in no rush to start them on solids because we’re just beginning to enjoy the time of feeding them without projectile vomiting, covering ourselves in towels, and in general, having the house wrapped up like the quarantined cloaked and hooded mess in the movie ET before ET finally found his heartlight, let it shine wherever you go, let it make a happy glow for all the world to see, Amen.
Three days after their 6 month birthday, and two days before their 6 month appointment, we gave them their first solid: sweet potatoes. Up until that time, we had been giving them their solid at mid-morning and mid-afternoon, starting with 1 tablespoon once a day and moving up to 3-4 tablespoons twice a day and not as runny. At our doctor appointment, though, he suggested giving them their solids when WE would eat solids – breakfast, lunch, and dinner – so that as time passes and they drop bottles, what’s left is regular meal times.
INFANT FEEDING SEATING
As an aside, I address here, for purposes of relevance, a question my good friend Meg asked about the chairs we use for the kids. We use the Chicco Hippo Hook-On Chair. They retail for a totally-worth-it $49.99 each. Our house is small and narrow and there is no space for two traditional highchairs. The Hook-ons are best used on tables that are well grounded with four legs (not the tables with one central ‘leg’ which become a tipping hazard). The seats are very secure after installation and the fabric is removeable and washable. And with messy eaters like Mateo, that is SO HANDY. To keep the table clean, we use Tiny Diner Placemats by Kiddopotamus. They wash and wipe easy and the little scoop is pretty invaluable.
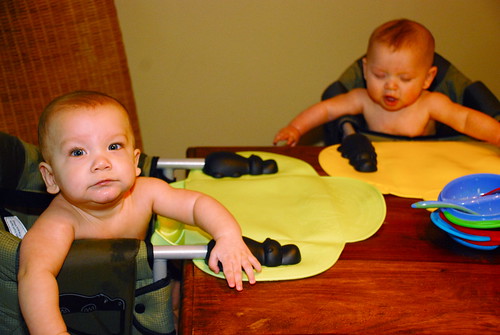
We haven’t gotten to the point of having to seriously attend to the rug under the table (since they are not yet feeding themselves), but after polling my local Mom’s of Multiples group, suggestions include clear office mats, oilcloth purchased from a fabric store, plastic floor protectors from Ikea, splat mats from Land of Nod, or a Mimi The Sardine mat which I’m told can also double as table covers for arts and crafts. Sure those last two are cute, but the sizes seem awfully small, particularly for the price. Two feet by three feet? Add some velocity to the wingspan of my kids and that will be no match, even if it does have cute ladybugs on it. For now, we use the purchased-on-clearance towels that are no longer protecting the couch from barfing.
INFANT FEEDING SCHEDULE
As for our infant feeding schedule, every care provider and parent is different, but we’re doing the following:
- Breakfast: 2 cubes solid + 2 tbsp rice cereal, followed by bottle if still hungry
- Mid-Morning Snack: bottle only
- Lunch: 2 cubes solid + 2 tbsp rice cereal, followed by bottle if still hungry
- Mid-Afternoon Snack: bottle only
- Top-Off Bottle: this is something we have the daycare do at 4:00p.m. because if the kids had to wait from 2ish to 7 to eat, their heads would spin off the axis of their necks. We have seen this happen and do all we can to avoid it.
- Dinner: 2 cubes solid + 2 tbsp rice cereal. No bottle. Mostly because they just had a bottle (anywhere from 2-7 ounces) at 4:00 p.m. and dinner is around 6:15 p.m.
- Night Snack: Bottle only – they get this after their baths.
MOTIVATION
I am by no means an extremist: I’m not a vegetarian, I don’t buy only organic, I do use disposable diapers, I do get my kids vaccinated, I do use tap water (though filtered through the refrigerator) for their bottles, I do use generic formula from Costco, I do use formula instead of breastmilk, I do use cleaning chemicals in the house and not just vinegar and water, I don’t grow my own vegetables, I do store food in plastic containers, I do not compost food scraps, I do recycle for the most part. Basically, I’m right down the middle when it comes to being environmentally conscious and responsible within reason for the kids. And I say because I am making their baby food (so far), but I don’t do it simply for green or health reasons. I also do it because I enjoy cooking and being in the kitchen.
RUNNING THE NUMBERS
In my first batch, I made TEN DAYS WORTH OF ORGANIC FRUITS AND VEGGIES FOR TWO BABIES FOR UNDER $22.00. For this post, I ran some numbers and discovered that 16 packs (servings) of Stage 1 food in a container that is 2.5oz each would run an average of $10.50. (and would probably include some waste because the kids are not yet eating 2.5 oz solids at each meal yet). For two kids then, $22.00 worth of containered food would get me through roughly 6.5 days.
Ok, so yeah, there’s the time factor (5 hours over three nights, including prep and cleanup, split up that way because we also wanted to watch TV or needed to do laundry, etc.) and the gas-factor. And I could go around justifying this dollar and that trip and whatever, but the fact is I love being the kitchen, don’t find it stressful, and am rather enjoying it. SO MOM, IF YOU ARE LISTENING, I AM NOT TRYING TO BE A SUPERMOM OR SUPERHERO OR TOO EARTHY, IT’S JUST A NON-ISSUE FOR ME SO BACK OFF BECAUSE MY STUBBORNESS CAME FROM YOUR SIDE OF THE FAMILY.
MEAL PLAN
The first batch included sweet potatoes, pears, apples, butternut squash and carrots.
This week, I’ll make cauliflower, peas, mangos, watermelon, and zucchini. I’m mostly running through the veggies first, but there will be enough stored to last us (including what they’ve already eaten) through the end of November. Not bad.
RECIPE BOOKS
To be honest, I could have just as easily found some basic information from the internet and gone from there. For example, an old Young Life Wilderness Ranch Staff buddy recommended Wholesome Baby Food and I am sure there are countless others. I know of some readers who love the Annabel Karmel website. But since I had purchased or received these books from my registries prior to the Vomit Months, I’ll go ahead an list them here:
Baby Blender Foods – decent book. Tells you what can be frozen, gives some recipies, etc.
Anne Karmel’s Top 100 Baby Purees – pretty pictures, better information on freezing/serving, but hugely skimpy on the first foods, and some of the multi-ingredient recipes are just flat out frightening.
METHODOLOGY
Step 1: Depending on the vegetable or fruit, I may have to peel or cut prior to cooking. My favorite peeler is the Swiss Kuhn Rikon, first recommended to me by Chef Randy Evans, the executive chef I spent the day with during my fabulous 33rd birthday present.
I picked up the Swiss Kuhn Rikon peeler at Sur La Table , they’re super inexpensive and super sharp. I know this because I accidentally peeled half my finger nail off in one stroke while peeling sweet potatoes. They’re no longer on Sur La Table’s website, but I know they sell them there.
Step 2: Because steaming food preserves the nutrients, has less nutrient runoff from water, and I can also use the same water (with nutrients still in it) to thin the food item in the food processor, I mostly steam the food. But let’s get real here, I steam the food because it gives me a chance to use my lovely Dr. Weil™ Spring® Healthy Kitchen 2-Tier Steamer that I love almost as much as Mateo loves his Wubbanub Penguin and as much as Harper hates to take naps. I tend to make enough of the vegetable to cover dinner(s) for Jen and I and at least 4 days worth per food item for the kiddos. (Some families do far less than that between introducing new foods, some go a whole week. This works for us.)
Step 3: I’ve had a Cuisinart® Pro Classic 7-Cup Food Processor a very long time and am only now appreciating its usefulness. I can puree in seconds, or later, chop just as quickly.
My food processor just recently asked if it was getting a pension for all the use I’m giving it now.
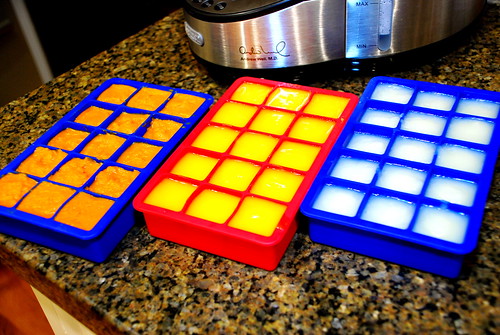
Step 4: After letting the puree cool, I pour the wholesome goodness into the ice cube trays directly from the food processor container. For somewhat thicker puree’s, I use a collapsible funnel that I picked up at Bed Bath & Beyond quite a while back.
For ice trays, I really like my “Perfect Cube” Ice Cube Trays. Each cube, when filled just below the top (so you don’t spill) is approximately 2 Tablespoons = 1 fluid ounce = 29.5736 Milliliters. You can order them online from Target, but I ended up purchasing mine from Sur La Table because they were, surprisingly, less expensive there and there’s a storefront not far from home. A “serving” of baby food is usually about 50ml, so there.
Step 5: I cover the ice cube trays with plastic wrap and stack them in the freezer over night. Usually by the next morning, and most definitely by the next evening, I can pop out the cubes from the trays and store accordingly.
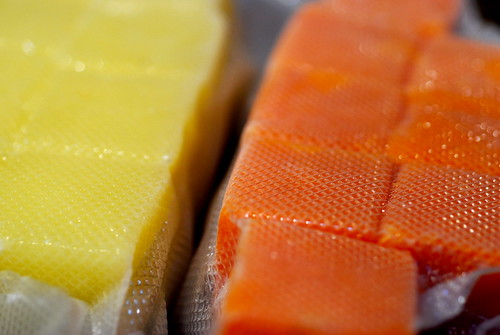
Step 6: The majority of the food cubes, particularly since when I am making baby food, I’m making it in bulk, gets stored in the freezer using my Foodsaver Food Sealer Vacuum. FoodSavers keep food up to 5x fresher than traditional ziplocks and risk of freezer burn is close to the chance of Mateo not drooling for a whole day. I purchased mine from Bed Bath & Beyond about two years ago, and it’s in their stores, though not on the website. I just gotta use those 20% off coupons that come in the mail.
Step 7: I leave out and/or take out of the freezer 24-48 hours worth of food at one time. I store these in serving portions in The First Years Take-N-Toss Bowls with Lids containers which my sister suggested and I now love. They come in a pack of 7 for around $3.50. I bought three packs so there’s enough for two kids for a day’s worth to be in the dishwasher, the refrigerator, and daycare. I made labels (we have to label everything for day care) and have containers labeled Breakfast, Lunch, and Dinner. So no matter who is feeding them or whether it is at home or away, there’s no question as to what and how much to feed.
I’m not willing to say that I’ll forever make their food, or even that I will not use jarred food. I’m not averse to using jarred food in a pinch. If parenting has done anything to me, it has made me a much more flexible, this-is-somewhat-our-plan-but-we’ll-see-how-things-go kind of person. For now, it works, and it gets me back in the kitchen, doing a thing that I love to do, and knowing that I’m participating in providing my entire family with nutritious foods.
